Installation Instructions
- Timber Floors
- Timber/Metal Frames
- Concrete Floors
- Brick/Concrete Walls
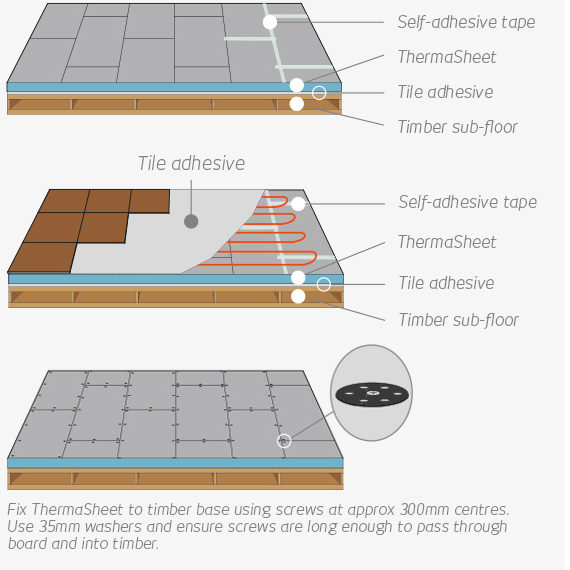
Fixing ThermaSheet to Timber Floors
Adhesive
ThermaSheet can be laid directly on to a level floor using a suitable rapid set tile adhesive. Solvent based or ready mixed adhesives MUST NOT be used. Apply adhesive bed to the floor using an 8mm square notched trowel. Bed the boards firmly into the tile adhesive in a staggered joint pattern, ensuring that there are no gaps between the boards. Use a straight edge and level to ensure a good alignment. Do not allow the adhesive to form a dry skin. Tape all joints between the boards using a self-adhesive reinforcing tape. For water proof construction, all joints must be covered with waterproof tape and treated with approved polyurethane water proofing agents as per manufacturer’s recommendation.
Mechanical Fixing
ThermaSheet should be fixed to a secured wooden base using approximately 12 screws per 1250mm x 600mm board, at 300mm centres. Use a 35mm washer under each screw head and tighten the screw until the washer bites into the board to give a firm hold. Use a straight edge and level to ensure a good alignment. The screw should be long enough to pass through the board and into the wooden base beneath. Ensure that there are no electrical cables or pipework beneath the floor that may be damaged when fixing the boards. Boards should be laid in a staggered joint pattern. For water proof construction, all joints, penetrations and fastener locations must be covered with waterproof tape and treated with approved polyurethane water proofing agents as per manufacturer’s recommendation.
Fixing ThermaSheet to Timber/Metal Frames
This system uses timer or metal studding designed to provide rigid support for ThermaBoard. The unsupported span of the framework depends on the thickness of the board. It is not recommended to use boards less than 10mm thick to line walls. All board edges must be supported. Please note the following guide for stud work related to thicknesses of the board:
- 20mm board (or thicker) use 600mm centres
- 12mm board use 400mm centres
- 10mm board use 300mm centres
Use 8 galvanised screws and washers per m2, set at a minimum of 30mm from the edge of the board. Tighten the screw until the washers bite the board surface. Ensure boards are well butted together. Use a straight edge and level to ensure that boards are aligned. Tape all joints with self-adhesive mesh, and then apply a thin layer of tile adhesive on the mesh surface. For water proof construction, all joints, penetrations and fastener locations must be covered with waterproof tape and treated with approved polyurethane water proofing agents as per manufacturer’s recommendation.

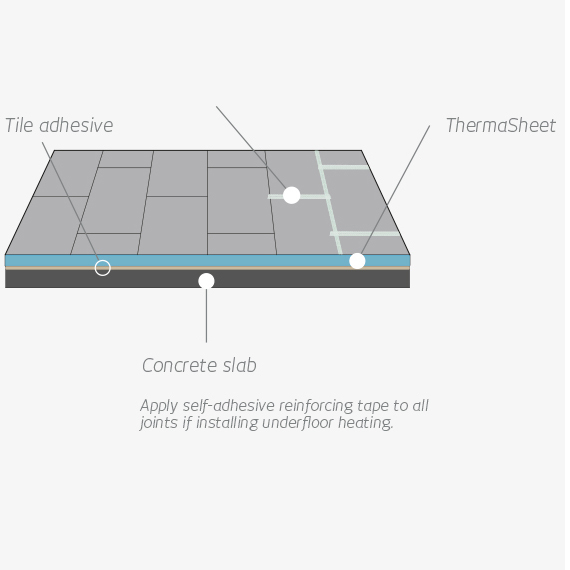
Fixing ThermaSheet to Concrete Floors
Ensure that the floor is level and free from dust and any loose debris. New concrete floors should be left to cure prior to fixing ThermaSheet and then the concrete floor should be sealed with a primer. A suitable rapid set tile adhesive should be used - solvent based or ready mixed adhesives MUST NOT be used. Apply the adhesive bed to the floor using an 8mm square notched trowel. Bed the boards firmly into the tile adhesive in a staggered joint pattern, ensuring that there are no gaps between the boards. Any slight depressions in the concrete floor are usually taken up with the thickness of the adhesive. Use a straight edge and level to ensure a good alignment.
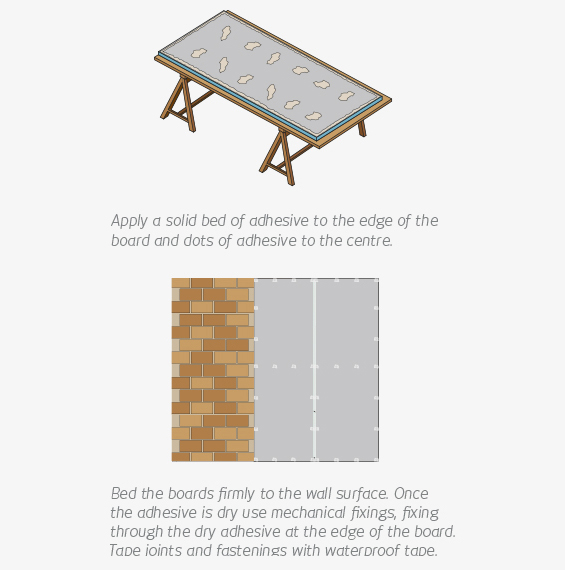
Fixing ThermaSheet to Brick/Concrete Walls
Dot and dab method for boards of 12mm or greater thickness:
Ensure that the existing wall surface is sound and free from dust and grease. Apply a cement based flexible tile adhesive directly to the board. A solid bed of adhesive should be applied to the edges of the board and dots in the centre (maximum 300mm apart). Adhesive should not exceed 30mm thickness. Offer up the board vertically to the wall surface and bed firmly into place. Always use a straight edge and level to ensure that the boards are well aligned. Ensure boards are well butted together. Once the adhesive has completely set mechanical fasteners should also be used. Position the screws and washers approx. 600mm apart, fixing through the hardened adhesive approx. 30mm from the edge of the boards.
When all the boards have been firmly placed and fixed the joints can be taped. For water proof construction, all joints, penetrations and fastener locations must be covered with waterproof tape and treated with approved polyurethane water proofing agents as per manufacturer’s recommendation. Fixing boards less than 12mm thick to brick or concrete walls: The dot and dab method is not recommended for fixing boards that are less than 12mm in thickness to brick or concrete walls. For boards less than 12mm thick it is recommended that a solid bed of adhesive is applied to the surface of the board using a notched trowel and then boards are applied to the wall. All other stages in the application process should be followed.